
Cart
0
Warning
1.Do not use soap, detergent, diluent, gasoline, alcohol, or other volatile solvents to clean the system. Otherwise, it may cause cracks, scratches, and discoloration.
2.Do not install or store the system in a location exposed to direct sunlight, as this may cause the aging of the product parts, or clog the filter because of the algae growth.
3.Do not place the system near flammable or volatile substances, heat sources, or fire.
4.Do not install the system in an outdoor environment. Be sure to use the system at a temperature of 4-40℃. When the water temperature is below 0℃, shut off the water supply and drain the residual water to prevent the system from freezing and being damaged.
5.The working pressure of this system is 0.1-0.5 MPa. When the water pressure is lower and higher, install a pressurizer or a pressure reducer accordingly.
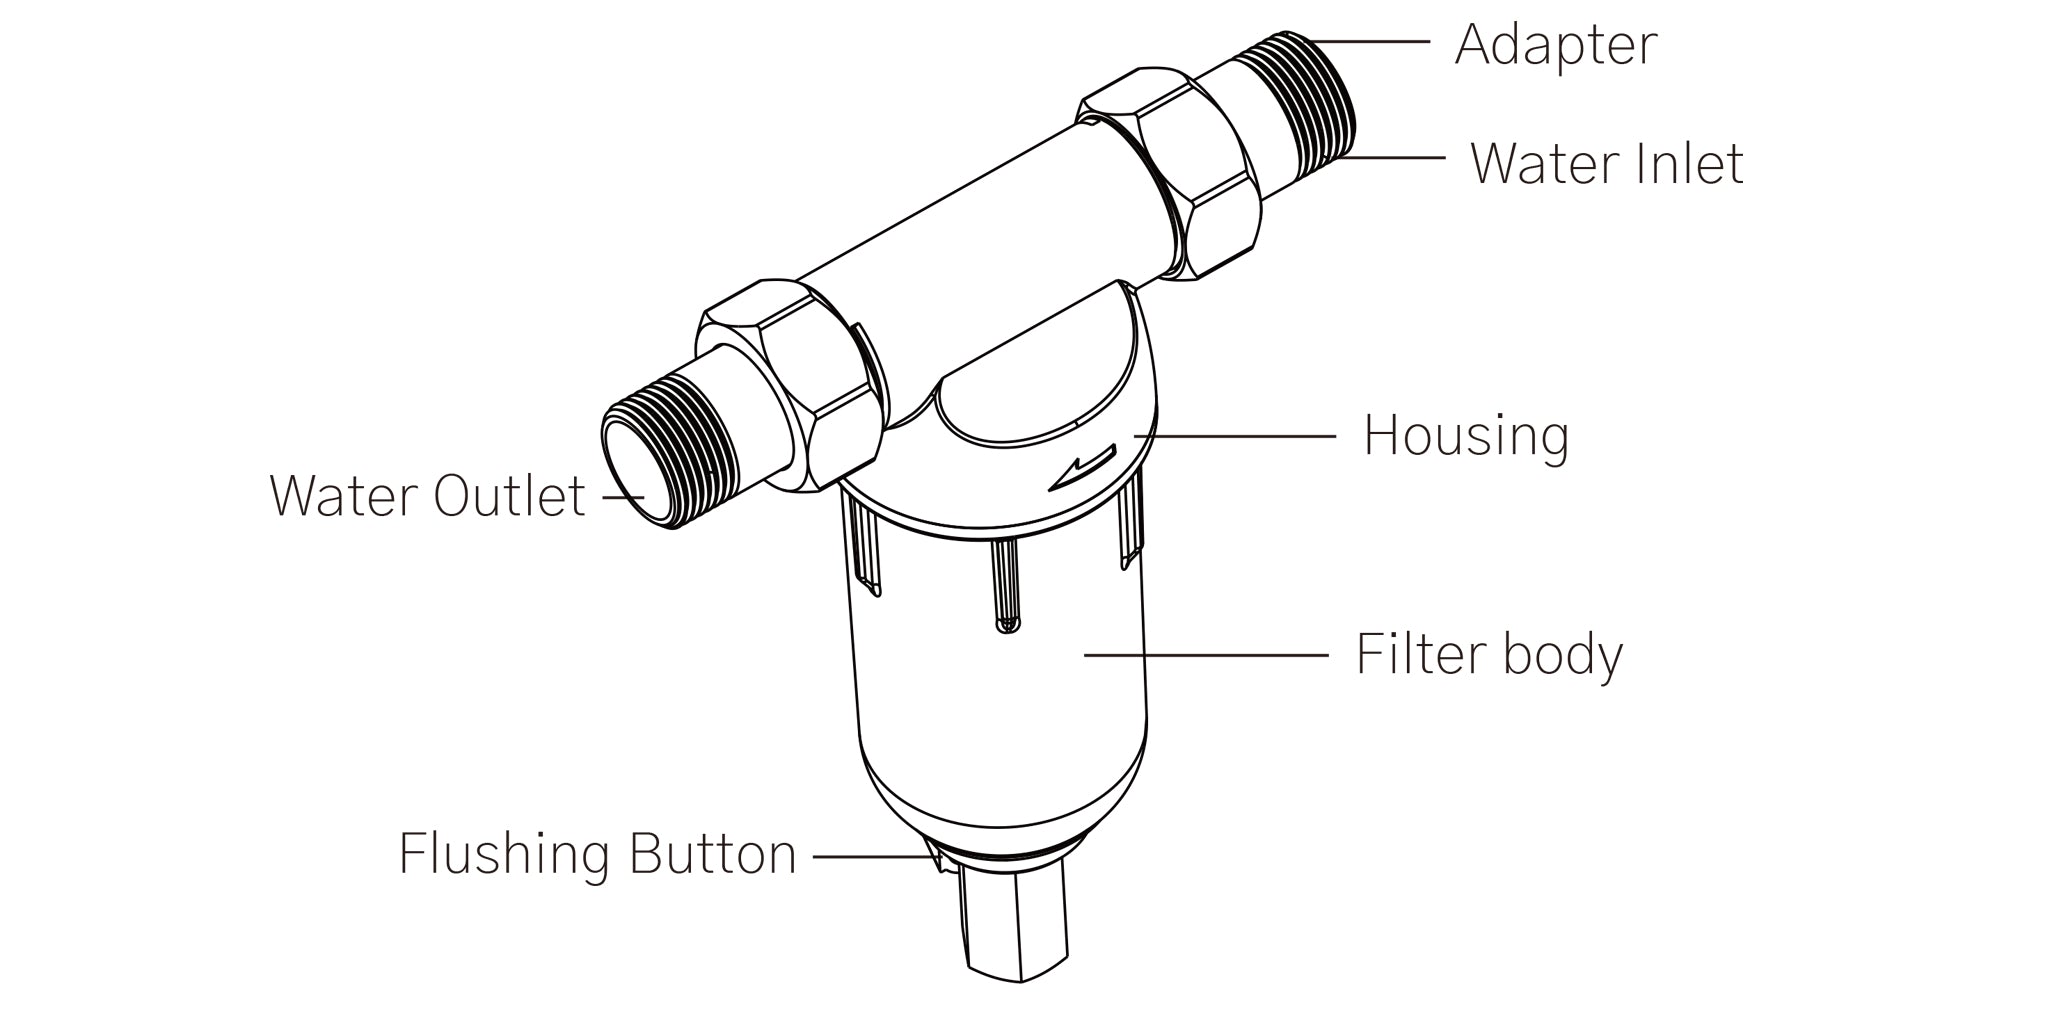
Product Introduction
The Spin-down Sediment Filtration Systemfilters municipal tap water or well water through a stainless-steel filter mesh, which can filter out sediment, rust, suspended solids, and parasites in the water. The system can be manual washed. It effectively protects appliances such as water purifiers, water heaters, wall-hung boilers, washing machines, dishwashers, and solar showers.
Installation Guide
Installation Size
Installation width: 151mm (minimum width)
Installation height: 300mm (minimum height)
Installation Instructions
1. The location of the filter should be considered before the overall waterway is laid.
2. A water inlet valve should be installed before the inlet water port for later use and maintenance.
3. If there is pipe well, consider installing it on the main pipe behind the water meter.
4. If there is no pipe well, consider installing it on the inlet pipe after entering the house.
5. According to the water inlet position of the water heater or the equipment that needs pretreatment water; consider installing on the main pipe of the kitchen or bathroom with the water heater.
6. Do not install on or behind hot water pipes.
Installation Steps
The following installation instructions take the PPR pipe connection waterway as an installation example.
If the household waterway is connected by a metal hard pipe, special detours are required according to the actual situation.
1. First determine the installation position according to the product size (reserve a height of H≥300mm for sewage discharge) as shown in Figure 1(a), close the water inlet valve, open the outlet of the household faucet, and then use PPR scissors to cut a length of 151mm at the installation position, to install this product as shown in Figure 1(b). Pay attention to the remain water in the pipe with a container.
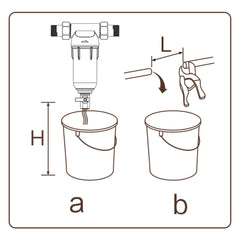 Figure 1
2. As shown in Figure 2, use the PPR pipe hot-melt machine "A" to weld one end of the cut PPR pipe and the joint "B" (PPR hot-melt joint with 3/4" internal thread), and the same method is used to weld the on the other end of the cut PPR pipe. Pay attention to the welding process quickly to ensure the welding quality. After the welding is completed, let it cool for 2 minutes.
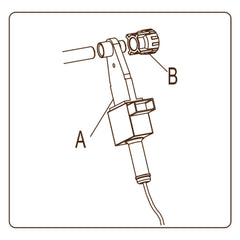 Figure 2
3. As shown in Figure 3(a), assemble the six-point thread union and hexagonal nut in the machine accessories. Fully wrap the teflon tape around the external thread of the six-point union, and then screw the wrapped joint assembly with the end joint welded by hot-melt machine, as shown in Figure 3(b). Treat the other end in the same way.
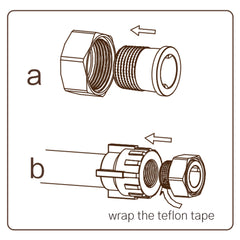 Figure 3
4. Screw the two sealing gaskets in the accessory with the threaded union components at both ends of the product with a wrench. Note that the water flow direction should be same as the arrow direction on the product, as shown in Figure 4.

Figure 4
5. Slowly open the water inlet valve. After the household faucet can flow water, close all the water outlets. Note that check whether the connections between the various parts of the product is leaking or slowly seeping. At the same time, you can open and close the drain valve to discharge and observe carefully. If there is water leakage or seepage, check whether the place is tightened immediately.
Direction for Use
1. After the installation, the user opens the water inlet valve and the filter starts to work normally. After the filter is working for a while, when the accumulated impurities looked through the transparent bucket have affected the water output of the household water equipment, the filter mesh can be cleaned.The flushing button at the bottom can be rotated to flush and discharge the filtered impurities.
2. When there are some sticky impurities accumulating on the filter mesh, or the impurities are embedded in the filter mesh, which cannot be cleaned by normal cleaning methods, and affects the water output and pressure of household water equipment, please contact Besdor after-sales service personnel for repair.
3. If there is any failure of the filter you purchased during use, do not disassemble the parts of the product in case of water leakage and damage to the product. Please turn off the water source, and then contact Besdor after-sales service personnel.
Fault Diagnosis and Troubleshooting
| Troubles | Possible Cause | Solutions |
| No outlet water | The water source does not have water | Wait for water to come back on |
| The inlet valve is not turned on | Turn on the inlet valve | |
| The surface of the filter mesh is blocked by coarse impurities | Clean the filer mesh | |
| Low outlet flow | The pressure of source water is too low | Adjust the source water pressure |
| The inlet valve is not fully turned on | Fully open the inlet valve | |
| The surface of the filters is partially blocked | Flush the filter mesh to remove impurities | |
| Water leakage or seepage at the joint | Not enough Teflon tape on the joint | Reapply Teflon tape and tighten |
| The parts in the leaking/seeping location not tightened. | Retighten the threaded joint with a wrench | |
| The sealing gaskets at the leaking/seeping location are damaged | Replace the sealing gaskets | |
| Filter parts have been disassembled | Check if the seal gaskets are missing |
Note: Please do not disassemble the parts of the product in case that damage to the product.